/Sarah Walker The Curated House

About Sarah Walker The Curated House

This author has not yet filled in any details.
So far Sarah Walker The Curated House has created 396 blog entries.

The Curated Collection | Filippo Minelli

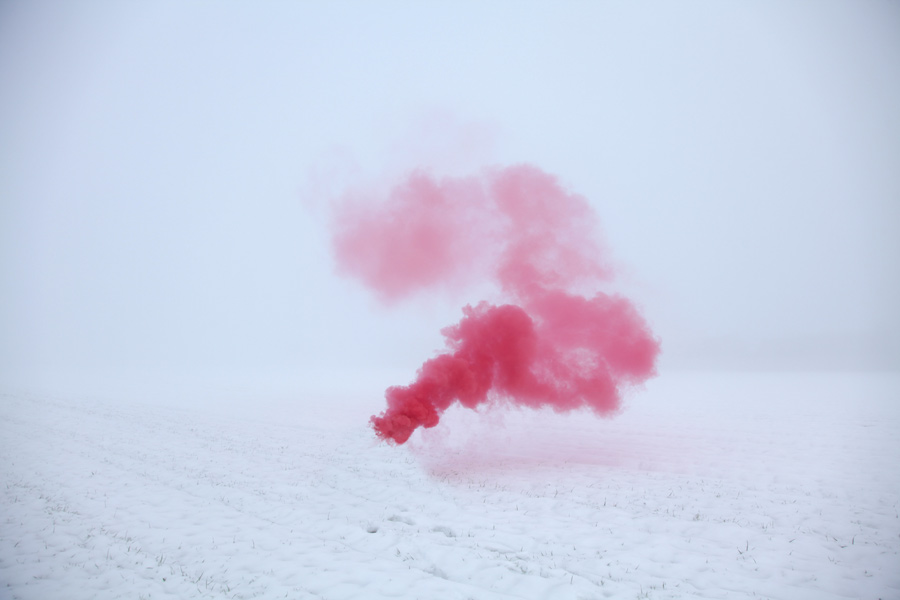
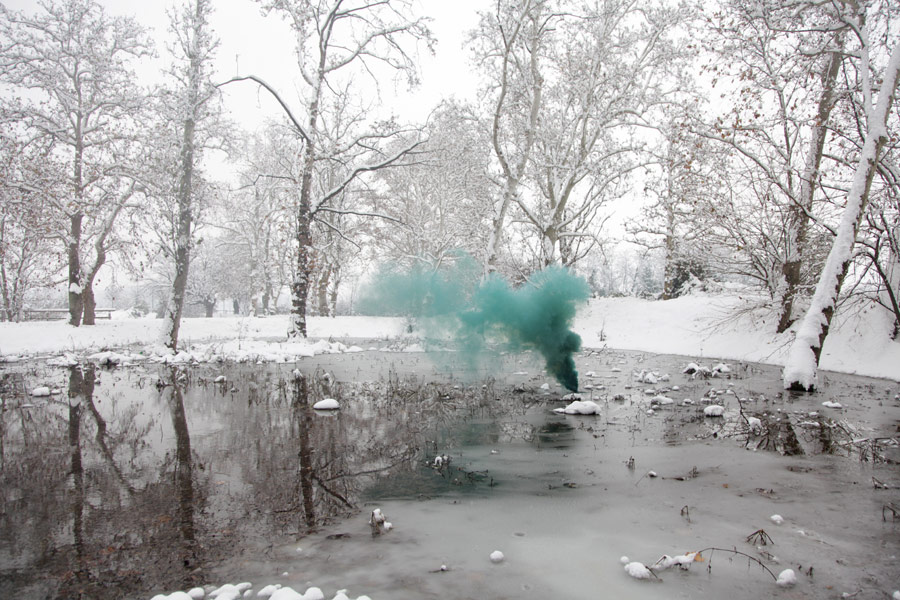
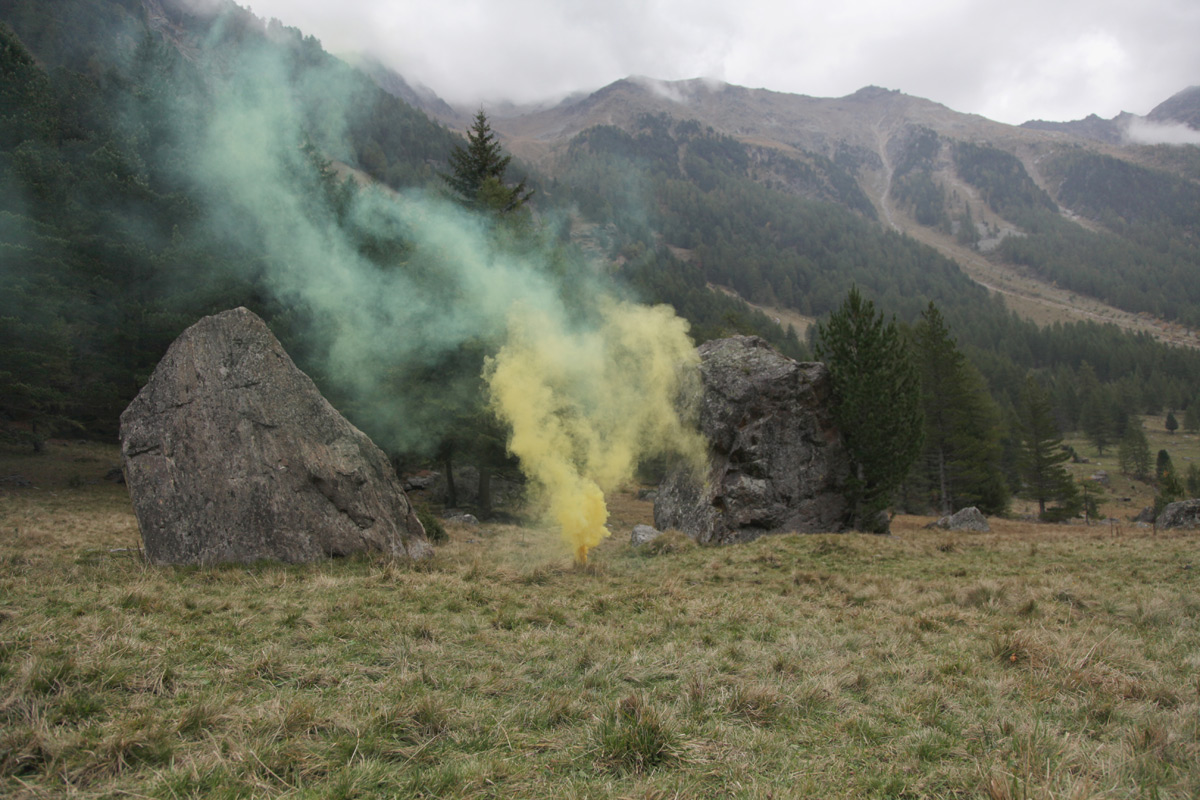
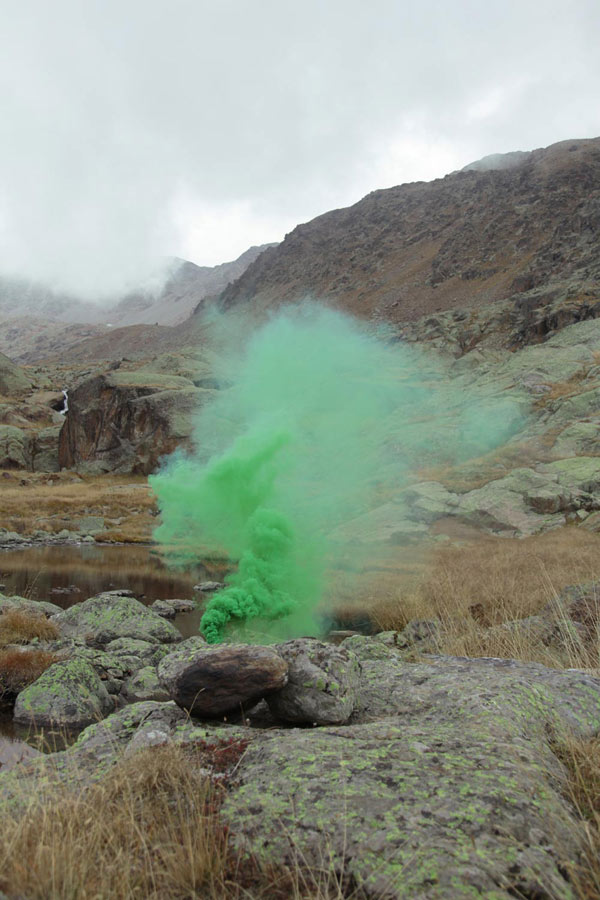
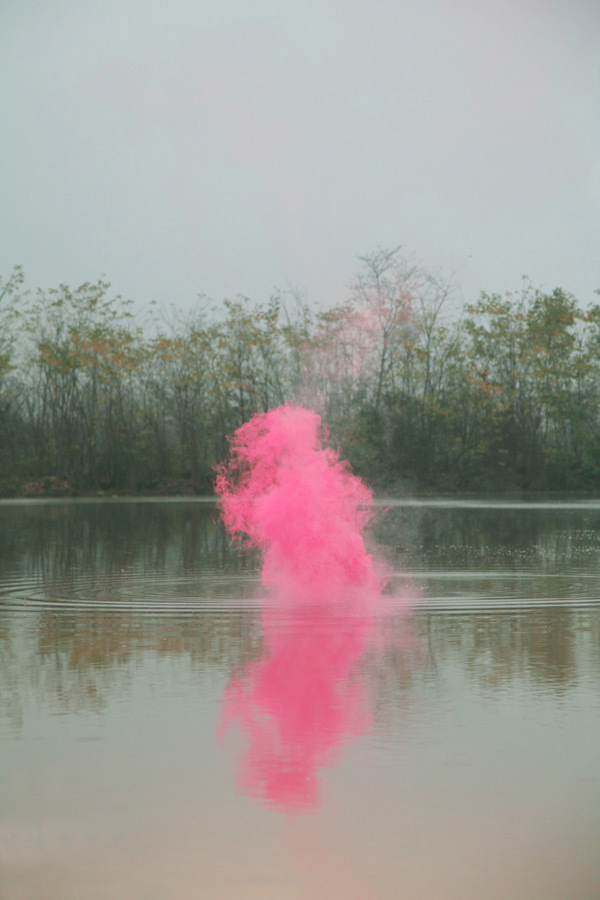
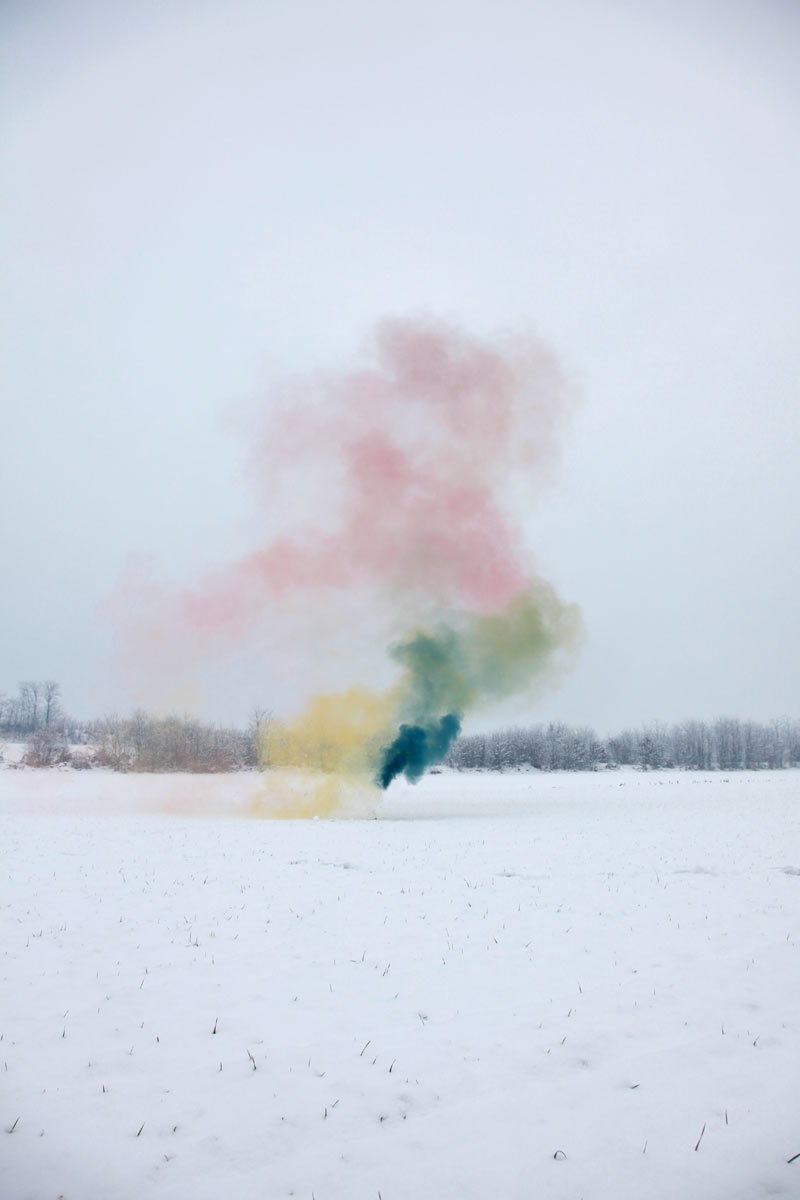
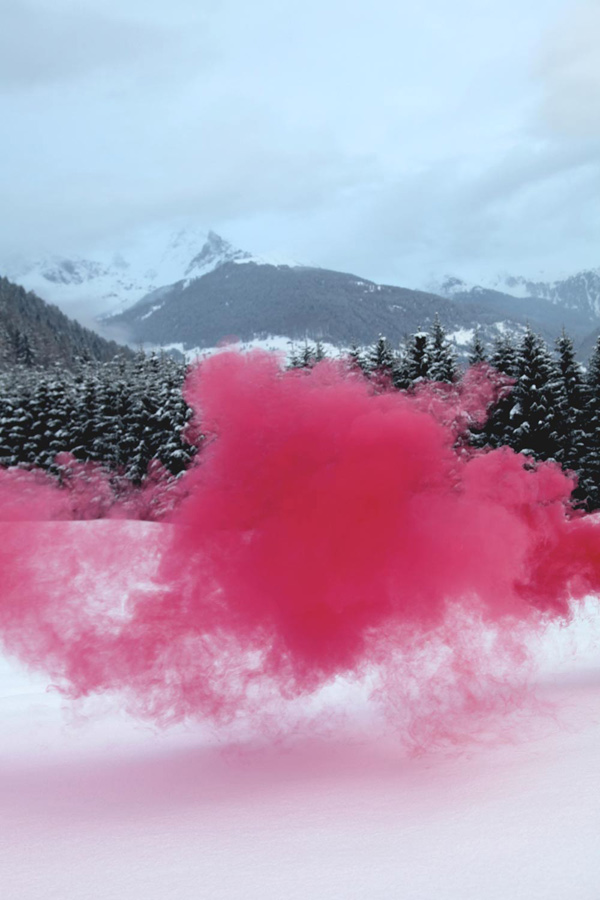
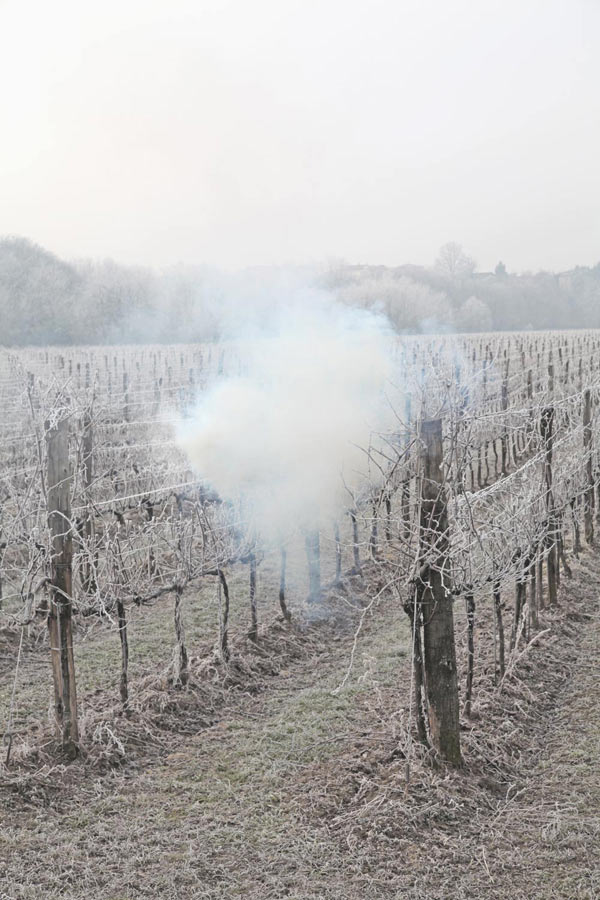
It was the simple, even austere, juxtaposition of the ethereal yet vibrant coloured smoke against the beauty of natural landscapes that first caught my breath and my attention. Stumbling upon the Silence/Shapes collection by Italian photographer Filippo Minelli felt like stumbling upon a treasure trove of modern photographic art.

Layered beneath the smoky veils of colour lies this fascinating artist’s statement:

Decontextualization of a violent tool changing quickly the surroundings, creating chaos, blinding the eyes, used in natural landscapes. The result proves that beauty can be found in clashing visions with an approach and aesthetic similar to romanticism. Showing the power of nature with the implication of religious aspects. Juxtaposing violence and beauty as a political statement.

I confess that the underlying statement about violence was lost on me until I read Minelli’s artist’s statement. For me, the striking contrast was enough to capture my admiration and attention with such arresting and unexpected beauty.

To my eye, these out-of-context, highly saturated puffs of transient colour create the kind of art I could see integrating into almost any interior space, offering a fiercely modern yet timeless edge.

What do you think of Minelli’s series? Can you envision one of his photographs in your space? What kind of energy do you think his work would bring to a room?

Happy Monday!

xo
s.

By |August 26th, 2013|0 Comments

Gluten Free Foodie Friday | Peach Galette

So it turns out that my pregnancy cravings happen to be perfectly in season! Who knew that August was officially the month of the peach? I certainly didn’t, but I did start craving them about two weeks ago – specifically, tree-ripened Niagara peaches. Their sweet, golden flesh and their decadent nectar exploding with each bite are like nature’s candy to my palate.

Having posted my craving on Facebook one night in search of a good local market carrying the tree-ripened variety, I was totally shocked, amazed and delighted to get a knock on my door the next day from a lovely friend who – in a spirit of total kindness and generosity – had picked some up on her visit to the market that day and dropped them off for me and the little bean to enjoy. And enjoy them we did! So did Noah who probably ate half of them himself, and the truth is I didn’t mind one bit. That is one indulgence I will never deny him!

Well, inspired by Steph’s super-kind, door-to-door tree-ripened peach delivery, I decided to create a gluten free Peach Galette this week in honour of Peach Month. And yes, let’s be honest, also in honour of my ongoing cravings and Noah’s latest {healthy!} obsession.

OK, so here’s where “confession time with Sarah” kicks in for a moment. It dawned on me as we were enjoying the freshly baked galette how surprised I was at how good it tasted, because I once believed myself to be a terrible baker! Like, totally-incapable-and-should-probably-never-try-it bad! I’m not sure if it was the university roommates who would get up at 6am just to bake muffins for their boyfriends that did it, or perhaps having a British Auntie who is basically a Cordon Bleu chef and baker. Either way, I’ve realized that my confidence in my baking abilities {and subsequent willingness to experiment with baking} only caught up to my willingness to experiment with my cooking skills just this year. Ironic, as now the exploration is complicated by being gluten-free! I wonder if perhaps that wasn’t the impetus that pushed me over the edge from fear to freedom? Either way, I’m grateful to be in a place where I no longer stop myself from trying, because sometimes the results are actually even post-worthy.

OK, enough self-reflecting for now, on to the recipe! This one really is all about the pastry dough, and I’m happy to report that it’s super easy with just a couple of thoughtful steps. Basically, it’s all about good flour and good butter and keeping things really cold. My British Auntie once told me that the secret to being a good pastry chef is to have cold hands. I have a warm heart…does that count?

THE INGREDIENTS:

Dough:
1 cup organic, unsalted butter
1/2 cup filtered water
3/4 tsp salt {I used Maldon}
2 1/2 cups Cup 4 Cup flour
1 Tbsp maple sugar
Heavy Cream to brush the crust

Filling:
2 large, ripe peaches, sliced
4 Tbsp maple sugar, plus more for dusting the crust

THE METHOD:

Start by taking a cold, 1 cup block of butter {this is a half-brick} from the refrigerator and cutting it into small cubes. Place the cubes in a freezer-safe container and freeze for a minimum of 10 minutes {up to an hour}.

Measure the water and dissolve the salt into it and then pop that into the freezer as well for about 10 minutes to chill it. Once the butter is chilled, measure your flour and maple sugar into your stand mixer bowl and with the paddle attachment {the whisk is too messy} add the frozen butter chunks and blend until it resembles flour-coated peas or grains of rice. {This can be done by hand with a bench scraper, but I don’t have ones and my hands aren’t very cold.} Slowly add the chilled salt water until the dough combines into a ball {you may not need all of the water}.

At this point, the dough may not be perfectly combined. Being careful not to overwork it, roll it 2-3 times on a floured surface, then create a ball {or two if you are choosing to make two smaller galettes} and pop it in the fridge to chill again for about an hour.

Preheat the oven to 375˚F and remove the chilled dough from the fridge. On a freshly flour-dusted surface with a freshly flour-dusted rolling pin, roll out the dough until it is 1/4-1/8″ thick. You don’t want it to be too thick or the dough will dominate the fruit. Trim the edges so you have a nice-ish circle, and then gently lay the dough into a buttered round cast iron pan.

{As a side note: I decided to make two galettes – one for now, one for later – so I only used half my dough and my small 8″ Le Creuset pan. You can also just bake your galette on a parchment-lined baking sheet.}

Next, slice your peach and arrange the slices to gently fill the crust with room to fold over the edges. Dust the peach slices with maple sugar and then carefully fold the edges in to nestle around the fruit.

Next, brush the crust with heavy cream and dust with maple sugar to entice it into a perfect, golden finish once it’s baked.

Bake in a 375˚F oven for 30-40 minutes until the crust is a perfect golden brown. Allow it to cool {at least enough that the hot fruit won’t remove a layer of skin from the roof of your mouth and permanently damage your tastebuds – this is my measure of “cool enough”} and enjoy with maple-syrup-infused whipping cream. My small galette made 4 servings, so no doubt using all the dough for one large galette would serve 6-8 quite happily.

I hope this weekend leaves enough you time – amongst the errands and activities of real life – to savour nature’s bountiful goodness and the even sweeter company of the ones you love.

xo
s.

By |August 23rd, 2013|1 Comment

Oh Baby! | Inspiration, RH style

I must admit that I have never been one for “buying it all in one place,” whatever “it” happens to be. I love a space that feels like it has been curated over time {thus the name of this blog}. But I have been so surprised and delighted with the new RH Baby & Child collection that I thought I would experiment a bit and design a mood board using exclusively RH Baby & Child furnishings.

Before I share that with you, though, you have to take a good look at these images from the stunning RH Baby & Child Gallery in Corte Madera, California. No doubt these photographs will give you some idea as to why I felt that playing with an all-in-one solution might just work.

Pretty much totally gorgeous, right? And these images really are just a taste of the full collection.

There were about a dozen or more directions I could have gone with this mood board design, but I decided to start with what will be the most important piece of furniture in the space for me. No, not the crib…any guesses? Well, since I need to keep writing this post before you can answer, I will tell you. It’s the chair. This mama knows from experience that many, many an hour will be spent gently rocking in this room, and so the chair will be my throne of comfort and peace, so to speak. Translation? It needs to be seriously, unquestionably comfortable. I have yet to do the “tushie test,” but I’d say this RH Baby & Child chair is already written in ink on my wish list.

Here’s what I  l – o – v – e  about it:

* It’s a modern classic – a wingback with clean lines and no stuffiness in it’s simplicity, and yet a gentle formality that feels very welcoming.

* It is slipcovered. Even better, you can choose to have it slipcovered in the Perennials Textured Linen Weave  {as above in Sand} which is an indoor/outdoor fabric. Translation: if the babe spits up or the diaper fails as an adequate containment unit for a Bangkok blow-out, this chair can be cleaned. Easily. And the indoor/outdoor fabric will be more likely to repel moisture and stains. When you take “pretty,” add comfortable, and up the ante with practical and functional, I’m totally in!

* You have the option of ordering the seat cushion as down filled. When I think about the many bleary-eyed nights ahead that will be spent sitting up and feeding the little bean, the idea of a down pillow for my tush sounds about right.

* This chair is interesting enough that it can transition into another room of the house quite easily, making it a sensible investment.

* It swivels and glides. So when I drop {or, more than likely, when the little cherub throws} that board book just a bit behind me while we are reading, I won’t totally put my back out when I turn around to get it! I’ll just gently swivel the chair and voilà! As we were.

So working from the chair out {my version of “from the ground up” for this nursery} here is the RH Baby & Child inspired room I’ve pulled together.

I chose to go with a very soothing and gender neutral colour palette when I pulled this together, and have since found out that we are having…. {drum roll please} ….a BOY!!! I truly feel that this nursery could work just as well for a girl with a few touches of blush and lace and loveliness thrown in for good measure, but that said, I find it interesting that this design plan does work particularly well for a boy. Perhaps my instincts were already pointing me in that direction before we knew for sure? It’s fun to think so.

I have to point out the details on one more piece of furniture from this design plan that I really do love, and that is the crib. Not only does it look beautiful in its original state, but it converts into a very classic and – dare I say handsome – toddler day bed for when the comes.

I do so love it when form and function meet like this! In an age of waste, I am increasingly passionate about seeing furniture pieces designed to be adaptable such that they get a lot more life lived in them before they get passed on. Well done, RH. Well done.

There you have it! My take on a gender-neutral, totally RH Baby & Child nursery design. It will be fund to see where inspiration take us as I hear from more friends on their take on the dream nursery. What pieces from this collection do you love the most?

xo
s.

By |August 21st, 2013|3 Comments