
” God is in the details”
– Mies van der Rohe
MOULDING MAGIC
Architectural detail has long been one of my passions. When I was 10, I used to lay awake in my bed dreaming of the crown moulding, baseboard and panel moulding I would use to decorate my room. It was glorious, and something out of a Haussmann Paris apartment. Mind you, back then it would also have been painted shades of teal or high gloss red, but at least I had one thing right. My passion for paneling and finishing details never left me, and it’s one of my favourite ways to add strength of character to an otherwise basic space.
I’ve worked with Metrie’s mouldings for many years now. They are my go-to for many reasons, not the least of which is the diversity of profiles they have available in FSC certified poplar. Poplar is by far the easiest wood to paint, and unlike MDF trims and mouldings, you don’t have to worry about formaldehyde in any adhesives (there are none). They also offer sustainably harvested woods like fir, pine and oak in such a variety of profiles that I really don’t think there’s much that can’t be accomplished with Metrie’s collection. In keeping with what we’ve done in much of the rest of the house, we decided to create a paneling feature on the headboard wall with a stepped effect.
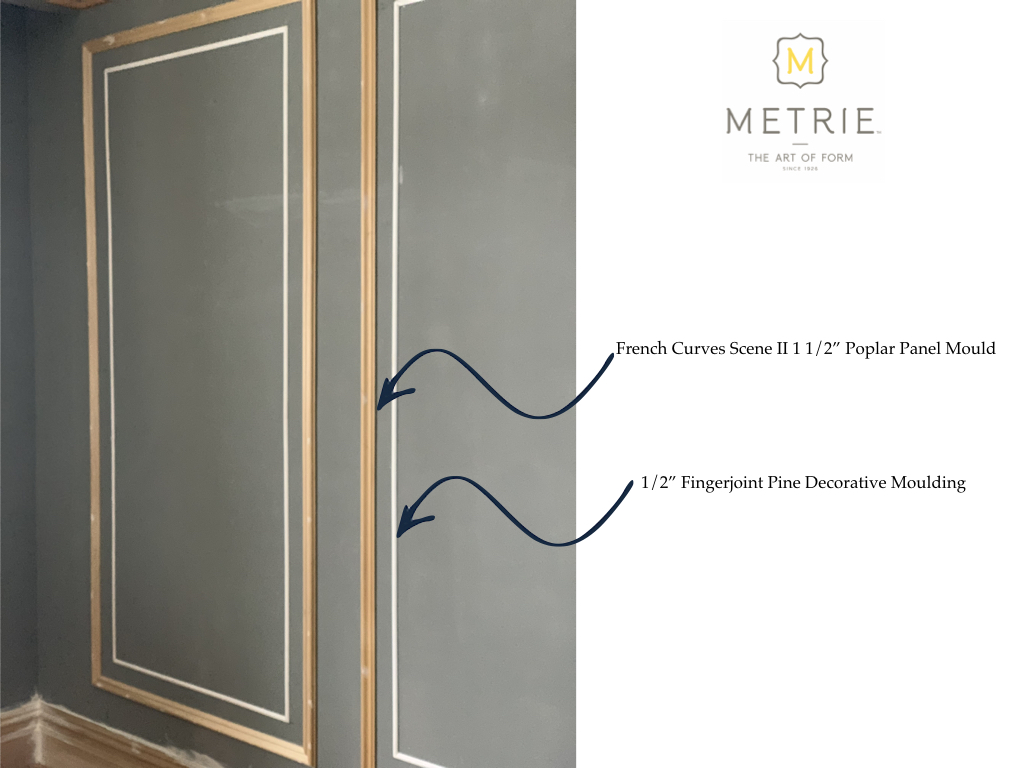
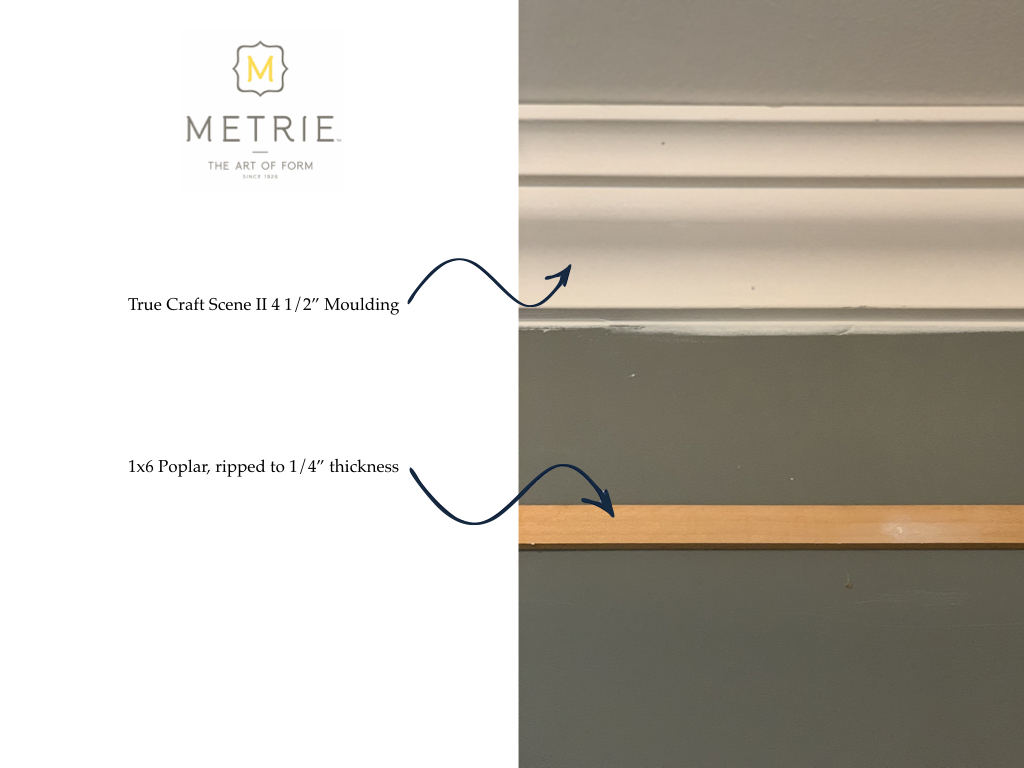
The two mouldings we used for this layered paneling are this larger one and this delicate one. These are truly my favourite combo. The two together offer depth and interest while the scale and proportion makes the room feel refined. You may notice that we carried a frieze mould around the room between the panels and the crown. This is how we’ve connected the pre-existing plaster valance in with the rest of the room to make it feel cohesive, and Graham made it by ripping 1/4″ thick strips off of simple Metrie 1×6 poplar boards. Metrie is amazing at offering varying lengths as well, so we were able to rip them off of boards the length of each wall to avoid any unsightly seams.
The same is true for the crown, which in this case is fir. I couldn’t work with too large a crown moulding for two reasons. The first is, we don’t have high ceilings in this bedroom – just 8 feet – so the crown had to be proportionate to the room. The second is that the wall opposite the bed is a wall of closet doors, and the crown had to fit between those doors and the ceiling. This profile was literally the perfect fit.

To round out the millwork plan, we upgraded the baseboards to match the rest of the house with this pretty poplar profile. Rather than changing the casing in the house, we opted to add a poplar backband instead, and we’ve done the same in the bedroom for consistency. It never ceases to amaze me how much of a difference these details make. If you’re dealing with a room that feels too basic, I promise you, this is the place to start. Everything you layer into the room from there will feel more elevated.
EMF PROTECTION + PAINT
When it comes to designing a healthy home, I know there’s a lot of mystery for people as to where to find the hidden toxins. Paint seems to be the one area everyone knows they can make a healthier choice. For me, painting our bedroom wasn’t just an opportunity to choose a locally made, VOC-free wall colour from the Fusion Mineral Paint collection. It was also an opportunity to finally delve into making our bedroom a more EMF-free sanctuary.
Let me explain. In my work to overcome Lyme Disease, I’ve done a ton of research on what could be compromising my body’s ability to heal. Electromagnetic Frequencies (EMF’s) have actually been classified by the World Health Organization as “probably carcinogenic to humans,” and Lyme expert Dr. Deitrich Klinghardt believes exposure to WiFi and EMF’s are the root cause for many health problems. Given that we are not building a new house or gutting it back to the studs, I can’t put shielded cables in the walls and a kill switch by the bed to cut off all circuitry into the bedroom each night. Rest assured this will happen in the dream house. For now, what we can do is set our router to turn off during our sleeping hours – a super easy and important step that any of you can take today to guard your health.
The next step in removing EMF’s from our bedroom was actually placing ruthless boundaries around electronics of any kind. We’ve never had a TV in our bedroom (and never will), but cell phones definitely crept in over time. I started charging mine in the bathroom years ago (and have now moved it to the kitchen to give my brain an even more extended break from the addiction so it’s not the first thing I grab when I wake up). For Graham, it took a lot longer to get him to agree to remove his phone from our room. Like many of you, he felt like he needed it as an alarm, but my sensitive body would be jolted awake by silent notifications he would get through the night. You may not notice them, but they’re messing with your body’s sleep cycle, too. Now, we both awake without an alarm clock, I think in part because we are sleeping so much better. Before we reset our circadian rhythms, though, we bought an inexpensive non-ticking alarm clock which honestly worked like a charm.

This next step in seeking to make our master an EMF-reduced sanctuary is new for me. I’ve never done this for a client because I’ve never had anyone as passionate about wellness as I am, but for this makeover, we primed our walls with Woremor IF-RE50 EMF Shielding Paint. This carbon based paint reduces the EMF’s that can enter the space. It’s not like wrapping the room in silver thread shield, but it’s a step in the right direction. One proviso: this paint is not VOC-free, just low VOC, and to be honest, the off-gassing from it forced me to sleep in Tate’s room for a few nights while we left our bedroom window open to clear the fumes. If you’re sensitive like me, you’ll want to keep this in mind.
Next up was to paint the walls with the finishing colour. I definitely went back and forth on what I wanted to do here, and my options were quite literally black and white. My next master bedroom may be really bright and airy, but in the end, the vibe I want for this one is sexy and moody and dark. Did you know that you actually sleep better in a really dark room? That doesn’t mean your paint colour has to actually be dark (black out curtains that fully block the light are really the most important step here), but it really does help to create a more cocoon-like invitation to rest. And so you guessed it, we’ve painted that beautiful panelling we installed in Fusion Mineral Paint’s Coal Black. I promise to show you a sneak peek of how it looks in next week’s update when I get to what we are doing to the ceiling, but for now I can tell you that the final coats of paint have been applied and I absolutely love it.
We’ve got a ton to get done this week with that ceiling treatment to install (it may or may not be giving me the sweats), drapery to install and lots of other design goodness. The One Room Challenge is always a race to the finish line, and I do hope you’ll not only follow along with my journey, but also take time to check in and see how everyone else is getting on with their projects. Here’s to keeping the final vision in our sights as we work our way through the messy middle.


Leave A Comment