/Search: fireplace

Need a new search?

If you didn't find what you were looking for, try a new search!

The Art of Architecture: A Rural Canadian Retreat

Remember last week’s post about Sacred Spaces featuring three truly inspiring homes created out of converted, centuries-old churches? This week I am delighted to share a soul stirring, sacred space of another kind. Surrounded by evergreen and hardwood forest, this home sits poetically atop the crest of a hill. Gently blurring the lines between nature and shelter, this home celebrates the connection between the outdoors and an inspired interior.

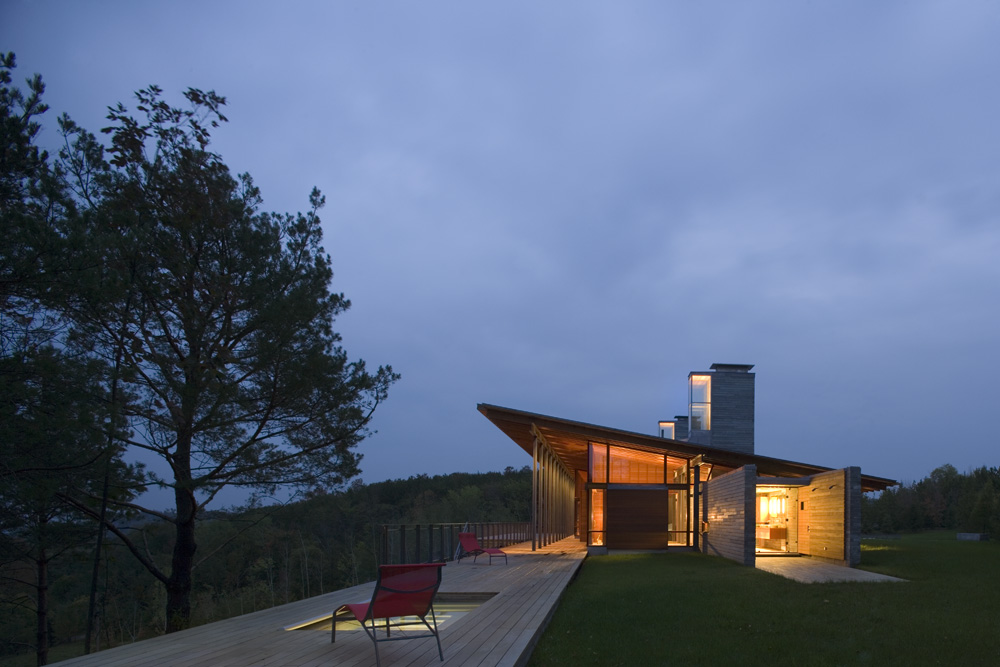
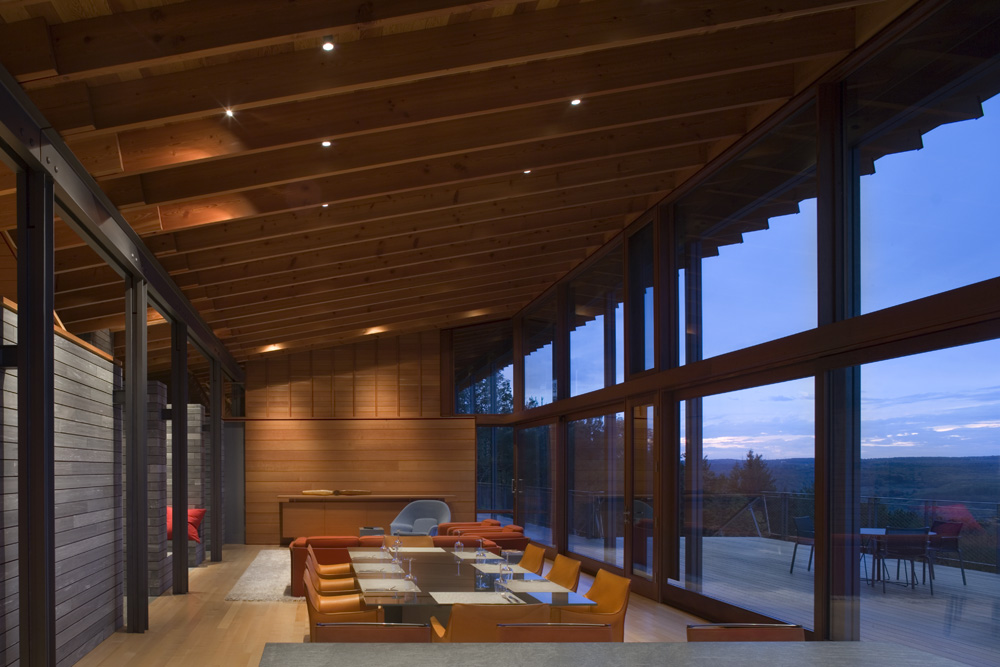
A year round retreat that also serves as a gracious gathering place, this home was intelligently and intuitively designed by architects Bohlin Cywinski Jackson.

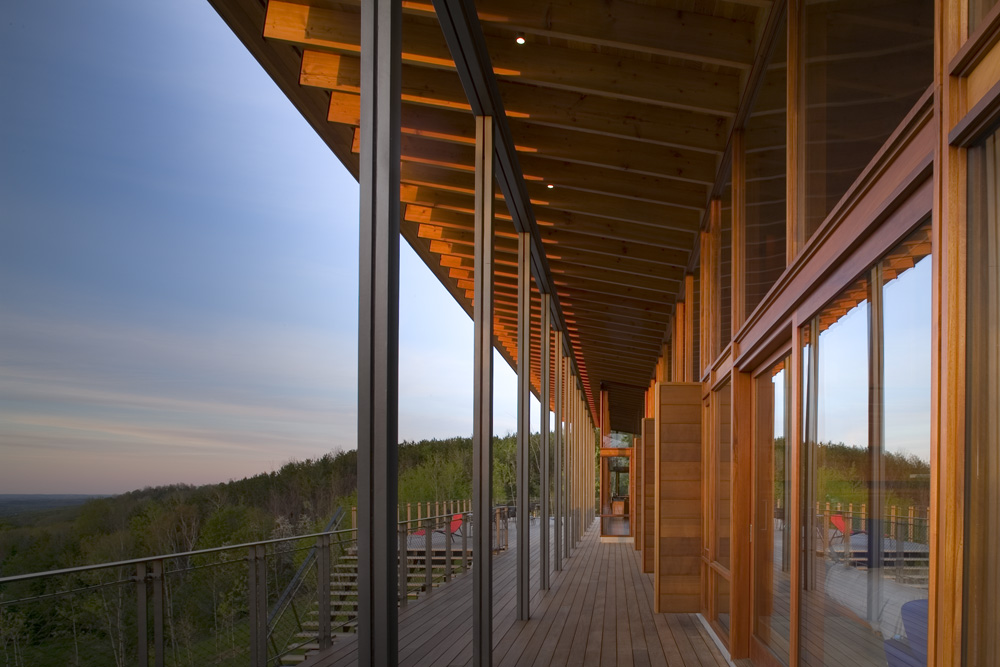
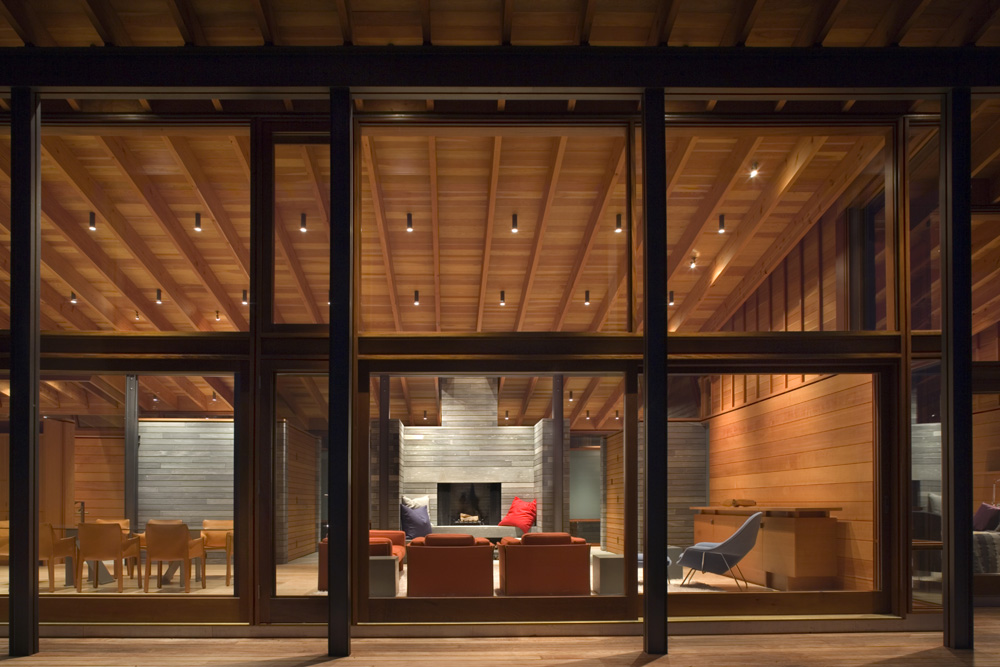
The continuity of finishes throughout the home – including the truly Canadian warmth of the Douglas Fir walls and ceilings – create a harmonious palette. This serves as the perfect backdrop to showcase all four resplendent seasons through the spectacular wall of glass that faces into the valley.

Even the outdoor fire pit – one of my favourite spaces on the property – connects to the indoors through the use of the same natural stone featured on the indoor fireplaces. The restraint and consistency of material use creates a calm and cohesive property that is at once stirring and rejuvenating.
All photos by Nic Lehoux courtesy of ArchDaily

My guess is this interior will inspire you to get outdoors and look for inspiration on how to bring the outdoors into your own home! I hope the use of materials and finishes featured will offer you some ideas on how to create cohesion and a sense of retreat in your own nest.

xo
s.

By |July 17th, 2012|0 Comments

“Ocean” Master Ensuite – Part 2 – Cabinetry

Yesterday I shared Part 1 one of one of my favourite clients’ bathroom renovation projects, revealing some of my secrets to creating interesting texture with the use of tile. Today I’m excited to share with you the cabinetry design and the 2-way fireplace “big reveal.”

As I said yesterday, my goal for the cabinetry was for it to have a very “furniture-like” look and feel while still being extremely functional for this bathroom application. I wanted to distinguish the “his and hers” sinks and break them up with the centre cabinet. Also on my creative designer’s “wish list” was to create a floating effect, with at least one element of the cabinetry cantilevered from the wall.

I also wanted the mirror to be dramatic, so in this case I designed a beveled 5″ mahogany frame that wraps around the entire vanity – floor to ceiling – and graphically defines the vanity area. The vanity feels like it is floating on the mirror itself, creating both a dramatic and sophisticated effect in the space.

I decided to face the centre drawer cabinet in crotch mahogany – one of my favourite woods for creating an artistic swirl of texture courtesy of nature herself. This cabinet also has a beveled face frame to tie in the details of the top (with the stone damper inset) and the larger scale bevel on the mirror frame.

Even the fireplace has a beveled edge around the face of the opening! No detail was left untouched.

Story time: Installing this floor-to-ceiling slab of vein-cut travertine was NO. SMALL. FEAT. In fact, the fabricator wound up doing it for us twice as they broke the slab on the way into the house the first time. {Design lesson: When renovating, expect the unexpected and the delays to go with it! The end result can still be spectacular, but remember to take your patience pill on stone installation day!} The end result is really breathtaking, and speaks so beautifully to what is on the other side.

I think this is one of the most beautiful fireplace surrounds I’ve yet to design. Inspired by the clean, sophisticated lines of the Deco period, I designed this waterfall, stepped mahogany mantel to sit proud of a paneled Sapele or ribbon-stripped mahogany wall.  This focal point in the Master Bedroom is powerful, grounding and extremely elegant.

I hope you’ll take away some inspired ideas for your next bathroom from this project. This one is truly a reflection of my motto: Beautiful process, beautiful product. SO loved working with this client!

xo
s.

All photos courtesy of Jordan Fretz

By |July 4th, 2012|1 Comment

“Ocean” Master Ensuite – Part 1 – Creating Texture with Tile

Today I thought I’d show you a stunning master ensuite that I had the privilege of designing for the loveliest of clients. She’s a woman with exquisite taste, is thoughtful and kind, and she trusts me implicitly {read: THE BEST}.


This was a renovation project, and as such, the floor plan wasn’t really up for negotiation. Moving the plumbing stack for the toilet would have just been too costly, and that was really the only change we would have considered (swapping it with the shower). Thankfully it was a generous space to start with and we were content with the placement of all the key elements. Our biggest change in the end was to add a 2-way fireplace…but I’m getting ahead of myself.

Regardless of whether you are renovating or redecorating, I always say you should start from your inspiration point and work your way out. As you’re coming to learn about me, I start with art whenever possible, but with a bathroom I start with the tile and the vanity design. Tile is not just tile anymore, my friends. Tile is an opportunity to work with colour and texture in some really inspired ways, especially if you think outside the box.

In the case of this bathroom, “outside the box” was about how we used the tile that captured our hearts: a Vein-Cut Ocean Travertine. We fell in love with it for its quiet, watery palette, but my creative imagination was already one step ahead with the excitement of what could be done with it.

What I love about the Vein-Cut stone is the linear grain structure. While it still has some natural swirl and variation, it has a much cleaner, more contemporary feel than Cross-Cut stone. This worked beautifully for this Master Ensuite where we wanted a warm but modern feel to the space.

Rather than just lay it straight, I chose to have the 12″ x 24″ tiles cut into 2.5″ wide planks (like hardwood flooring planks). I then designed a tile carpet, and the inset of the carpet was carefully crafted out of these 2.5″ x 24″ planks to create a stunning yet subtle, beautifully textured herringbone pattern. (Confession: I am addicted to all things herringbone!)

I designed the herringbone tile carpet to be bordered with a combination of 5/8″ x 5/8″ moonstone mosaics (5 rows) and then on either side of that, a single strip of 5/8″ x 6″ moonstone to create a clean finish. The remaining outer portion of the floor was set with uncut 12″ x 24″ tiles.

The photo above shows you one of my favourite details with the vanity. We used the same travertine in 1 1/2″ thick slab for the countertops (double the standard thickness of 3/4″). I wanted the vanity to feel like a furniture piece, so I decided to set the stone down into the top of the centre, raised drawer section to mimic a leather damper on an old fashioned desk. The beveled wood edge that slopes off from the stone inset is a simple but extremely elegant detail.

The placement of the tub over the border edge of the tile carpet really makes the tile carpet feel like an area rug in the middle of the space. I love this effect. It takes the plumbing fixtures and cabinetry to a whole new level while anchoring each element, tying them together as with an area rug in an elegant living room.

This photo shows our grouping of 3 small pieces of art leading into the bathroom (all from a series by David Gillanders via Art Interiors). For this project, the art was one of our finishing touches rather than our starting point, but the watery, blue-green palette is just perfect for the tile’s inspirational story line. I love how these 3 smalls connect so beautifully with the quiet colour and texture of the tiles.

Not to be forgotten, the shower was yet another opportunity to showcase tile in an interesting way. I made use of the linear grain on the walls to create a greater sense of depth by using the grain horizontally to push the eye away. The shower floor is a tumbled version of the same 5/8″ x 5/8″ mosaic. Always go for tumbled on the shower floor whenever possible – it has better grip and you won’t find yourself slipping as often! I absolutely love the beautifully framed and beveled shower cubby and the cantilevered solid stone shower bench (in the photo above). The floating effect of the bench mimics the “his and hers” floating sink cabinets on the vanity. This repeated floating element plays well off of the watery, suspended feeling of the colour palette. It takes the cliché of “spa bathroom” to a whole new level of sophistication in my book.
 

The shower’s tile inset reflects the border on the main floor’s tile carpet with the addition of a chair rail in the natural polished moonstone. So delicious you could almost bite it! I love the dimension the chair rail gives this shower detail.

Tomorrow I’ll share a bit more about the vanity and reveal the amazing 2-way fireplace we created. It’s a stunner! Can’t wait to share it with you.

xo
s.

All photos courtesy of Jordan Fretz

By |July 3rd, 2012|1 Comment